It is often needed to give the user the ability to choose among various options when creating an application. In that case, the UIPickerView it’s a nice (and many times the best) choice to do that.
The UIPickerView can be easily created using the Interface Builder, but unfortunately Apple doesn’t allow us to change its height through IB. Besides that, sometimes there is the need to create it and place it on-screen manually (programmatically) for a lot of reasons.
To create and manage UIPickerView programmatically it’s not that hard. In general, three things have to be done.
- First, declare an UIPickerView object in our .h file, synthesize it and release it in the .m file.
- Create our UIPickerView and set it’s properties (depending on what we want to do).
- Create all the methods needed to display data and manage our selections on UIPickerView.
For the purpose of this example, we’ll create a new project named PickerviewTestApp.
Go to the PickerViewTestAppViewController.h file and write the following:
[code language=”obj-c”]
@interface PickerViewTestAppViewController : UIViewController {
UIPickerView *pickerView;
NSMutableArray *dataArray;
}
@property (nonatomic, retain) UIPickerView *pickerView;
@property (nonatomic, retain) NSMutableArray *dataArray;
@end
[/code]
Our .h file is almost ready. Two things are remaining to be done. We need to declare a UIPickerViewDelegate and UIPickerViewDataSource in order for our picker view to work with our data.
So, go and complete the opening statement of our interface with the following:
[code language=”obj-c”]
@interface PickerViewTestAppViewController : UIViewController <UIPickerViewDelegate, UIPickerViewDataSource> {
[/code]
Great. We are ready to go for implementation now. Open the .m file and “synthesize” our objects.
[code language=”obj-c” highlight=”3,4″]
@implementation PickerViewTestAppViewController
@synthesize pickerView;
@synthesize dataArray;
[/code]
It’s a good practice to release any objects you have now. It’s almost certain that by doing that you won’t forget any unreleased object and you won’t have memory leaks in your application. Thus, go down, find the dealloc method and add what you see:
[code language=”obj-c”]
– (void)dealloc {
[pickerView release];
[dataArray release];
[super dealloc];
}
[/code]
In the viewDidLoad method we are going to setup our data array and create the picker view with all the properties we want.
[code language=”obj-c”]
– (void)viewDidLoad {
[super viewDidLoad];
// Init the data array.
dataArray = [[NSMutableArray alloc] init];
// Add some data for demo purposes.
[dataArray addObject:@"One"];
[dataArray addObject:@"Two"];
[dataArray addObject:@"Three"];
[dataArray addObject:@"Four"];
[dataArray addObject:@"Five"];
}
[/code]
Let’s suppose we want our picker view to occupy the ¾ of screen’s width and 200px height. Also, let’s say that we want it centered horizontally. So first it’s necessary to calculate the screen’s width. To do that, we use the [[UIScreen mainScreen] bounds] as shown below:
[code language=”obj-c”]
– (void)viewDidLoad {
[super viewDidLoad];
// Init the data array.
dataArray = [[NSMutableArray alloc] init];
// Add some data for demo purposes.
[dataArray addObject:@"One"];
[dataArray addObject:@"Two"];
[dataArray addObject:@"Three"];
[dataArray addObject:@"Four"];
[dataArray addObject:@"Five"];
// Calculate the screen’s width.
float screenWidth = [UIScreen mainScreen].bounds.size.width;
float pickerWidth = screenWidth * 3 / 4;
// Calculate the starting x coordinate.
float xPoint = screenWidth / 2 – pickerWidth / 2;
}
[/code]
Time for the picker view:
[code language=”obj-c” highlight=”21, 22, 23, 24, 25, 26, 27, 28, 29, 30, 31, 32, 33, 34, 35, 36, 37, 38, 39, 40, 41″]
– (void)viewDidLoad {
[super viewDidLoad];
// Init the data array.
dataArray = [[NSMutableArray alloc] init];
// Add some data for demo purposes.
[dataArray addObject:@"One"];
[dataArray addObject:@"Two"];
[dataArray addObject:@"Three"];
[dataArray addObject:@"Four"];
[dataArray addObject:@"Five"];
// Calculate the screen’s width.
float screenWidth = [UIScreen mainScreen].bounds.size.width;
float pickerWidth = screenWidth * 3 / 4;
// Calculate the starting x coordinate.
float xPoint = screenWidth / 2 – pickerWidth / 2;
// Init the picker view.
pickerView = [[UIPickerView alloc] init];
// Set the delegate and datasource. Don’t expect picker view to work
// correctly if you don’t set it.
[pickerView setDataSource: self];
[pickerView setDelegate: self];
// Set the picker’s frame. We set the y coordinate to 50px.
[pickerView setFrame: CGRectMake(xPoint, 50.0f, pickerWidth, 200.0f)];
// Before we add the picker view to our view, let’s do a couple more
// things. First, let the selection indicator (that line inside the
// picker view that highlights your selection) to be shown.
pickerView.showsSelectionIndicator = YES;
// Allow us to pre-select the third option in the pickerView.
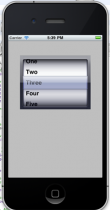
[pickerView selectRow:2 inComponent:0 animated:YES];
// OK, we are ready. Add the picker in our view.
[self.view addSubview: pickerView];
}
[/code]
The picker view is ready. One thing left, to add all those methods needed to make it work properly.
We need methods for the following:
The picker view is ready. One thing left, to add all those methods needed to make it work properly.
We need methods for the following:
-
- To tell our app how many components we have in our pickerView.
- To tell our app how many rows we have in our component.
- To display the text of each row.
- To do something when a row is selected.
Using the order above these methods are:
[code language=”obj-c”]
// Number of components.
-(NSInteger)numberOfComponentsInPickerView:(UIPickerView *)pickerView{
return 1;
}
// Total rows in our component.
-(NSInteger)pickerView:(UIPickerView *)pickerView numberOfRowsInComponent:(NSInteger)component{
return [dataArray count];
}
// Display each row’s data.
-(NSString *)pickerView:(UIPickerView *)pickerView titleForRow:(NSInteger)row forComponent:(NSInteger)component{
return [dataArray objectAtIndex: row];
}
// Do something with the selected row.
-(void)pickerView:(UIPickerView *)pickerView didSelectRow:(NSInteger)row inComponent:(NSInteger)component{
NSLog(@"You selected this: %@", [dataArray objectAtIndex: row]);
}
[/code]
Ready to go. Build and run your app to see the result.
Now we’re having a working UIPickerView, we can extend it a little more. As you will see when the app is running, each row’s text is aligned to the left and of course the only formatting exists is the default one. The question is, how can we add custom font formatting and alter the alignment of the text in the picker’s rows? The answer is by using a UILabel.
Note this: if you want to do custom formatting in your pickerView, forget the third method above (this one):
[code language=”obj-c”]
// Display each row’s data.
-(NSString *)pickerView:(UIPickerView *)pickerView titleForRow:(NSInteger)row forComponent:(NSInteger)component{
return [dataArray objectAtIndex: row];
}
[/code]
We need to use another method for this purpose, in which we’ll create a UILabel, set all the properties we want and return this one instead of returning a single string with row’s text.
(You may comment all the code in the above method or erase it before you use the next one)
[code language=”obj-c”]
-(UIView *)pickerView:(UIPickerView *)pickerView viewForRow:(NSInteger)row forComponent:(NSInteger)component reusingView:(UIView *)view{
// Get the text of the row.
NSString *rowItem = [dataArray objectAtIndex: row];
// Create and init a new UILabel.
// We must set our label’s width equal to our picker’s width.
// We’ll give the default height in each row.
UILabel *lblRow = [[UILabel alloc] initWithFrame:CGRectMake(0.0f, 0.0f, [pickerView bounds].size.width, 44.0f)];
// Center the text.
[lblRow setTextAlignment:UITextAlignmentCenter];
// Make the text color red.
[lblRow setTextColor: [UIColor redColor]];
// Add the text.
[lblRow setText:rowItem];
// Clear the background color to avoid problems with the display.
[lblRow setBackgroundColor:[UIColor clearColor]];
// Return the label.
return lblRow;
}
[/code]
Note that the return type of this method is UIView * instead of NSString * we had in the previous one.
That’s all. I hope the code to be proved useful.
Enjoy coding and feel free to experiment on your own.

This tutorial was transferred as it was originally written in my blog, therefore some techniques, tools or SDKs may have changed since then.