When building iPhone applications that support or provide text input, it’s often necessary to create some extra buttons (or other controls) beyond the ones provided by the default keyboard interface. Those buttons should be created for specific operations needed by your application, such as moving to the next or previous text field, make the keyboard disappear e.t.c. To understand what exactly this is all about, just see what’s happening when you are using the Safari browser and you type username/password values to login in your e-mail account. Just right above the keyboard, there are two buttons that allow you to move to the next or previous field and a third button that allows you to close the keyboard and see the whole browser again.
That area above the keyboard is an extra UIView, known as Input Accessory View. That view is supported by the UITextField and UITextView as well and is added to any control of that kind using the setInputAccessoryView method. But that’s the last step. All the controls existing in the Input Accessory View must be created prior to adding the view to the textfield/textview.
In this post I am going to show how to create an input accessory view programmatically. It’s supposed that you are already familiar writing code in the Xcode and have a basic knowledge on how to create UI controls and views manually. If you don’t, you’ ll learn now.
In this example we will create only two UITextFields. We will set the keyboard to numpad so we won’ t have any way at all to close the keyboard view. All those will be done using the Interface Builder. Then, programmatically we’ ll create two buttons to move between the fields and one more to close the keyboard view. We’ ll add these buttons to a UIView and set the view as our input accessory view that will appear every time that any of our two text fields get the focus (become first responder).
Let’s start. Create a new view-based application project named InputAccViewTest. Open the InputAccViewTestViewController.xib file using the interface builder and add two UITextFields at the top of your view (it should look like the following image):

After that select both of them and set the keyboard to numpad.

It’s also necessary to connect every textfield’s delegate to the File’s Owner object if you want everything to work properly:

Now the real work. Go to the InputAccViewTestViewController.h file and declare the UITextFieldDelegate:
[code language=”obj-c”]
@interface InputAccViewTestViewController : UIViewController
[/code]
Inside the block now:
[code highlight=”7, 8, 9, 10, 11, 12, 13″ language=”obj-c”]
@interface InputAccViewTestViewController : UIViewController {
// Declare the all the controls we need. We’ ll have the following:
// The UIView that will become our input accessory view.
// Two IBOutlets for our text fields (the ones created in the IB).
// A UITextField named txtActiveField which shows us the active textfield each time.
// The three buttons that we’ ll put in our input accessory view.
UITextField *txtField1;
UITextField *txtField2;
UITextField *txtActiveField;
UIView *inputAccView;
UIButton *btnDone;
UIButton *btnNext;
UIButton *btnPrev;
}
[/code]
Now the @property part just right below the closing bracket:
[code language=”obj-c”]
@property (nonatomic, retain) IBOutlet UITextField *txtField1;
@property (nonatomic, retain) IBOutlet UITextField *txtField2;
@property (nonatomic, retain) UITextField *txtActiveField;
@property (nonatomic, retain) UIView *inputAccView;
@property (nonatomic, retain) UIButton *btnDone;
@property (nonatomic, retain) UIButton *btnNext;
@property (nonatomic, retain) UIButton *btnPrev;
[/code]
Your .h. file should look like this:
[code language=”obj-c”]
@interface InputAccViewTestViewController : UIViewController {
// Declare the all the controls we need. We’ ll have the following:
// The UIView that will become our input accessory view.
// Two IBOutlets for our text fields (the ones created in the IB).
// A UITextField named txtActiveField which shows us the active textfield each time.
// The three buttons that we’ ll put in our input accessory view.
UITextField *txtField1;
UITextField *txtField2;
UITextField *txtActiveField;
UIView *inputAccView;
UIButton *btnDone;
UIButton *btnNext;
UIButton *btnPrev;
}
@property (nonatomic, retain) IBOutlet UITextField *txtField1;
@property (nonatomic, retain) IBOutlet UITextField *txtField2;
@property (nonatomic, retain) UITextField *txtActiveField;
@property (nonatomic, retain) UIView *inputAccView;
@property (nonatomic, retain) UIButton *btnDone;
@property (nonatomic, retain) UIButton *btnNext;
@property (nonatomic, retain) UIButton *btnPrev;
@end
[/code]
Go to the .m file to @synthesize our objects at the top of the file and after the @implementation statement:
[code language=”obj-c”]
@synthesize txtField1;
@synthesize txtField2;
@synthesize txtActiveField;
@synthesize inputAccView;
@synthesize btnDone;
@synthesize btnNext;
@synthesize btnPrev;
[/code]
Don’t forget to release all of them in the dealloc method:
[code language=”obj-c”]
– (void)dealloc {
[txtField1 release];
[txtField2 release];
[txtActiveField release];
[inputAccView release];
[btnDone release];
[btnNext release];
[btnPrev release];
[super dealloc];
}
[/code]
Go to the IB and connect the outlets to the UITextFields you created earlier.
Everything until here was more or less known stuff. Now create a method somewhere inside the .m file named createInputAccessoryView as below:
[code language=”obj-c”]
-(void)createInputAccessoryView{
// Create the view that will play the part of the input accessory view.
// Note that the frame width (third value in the CGRectMake method)
// should change accordingly in landscape orientation. But we don’t care
// about that now.
inputAccView = [[UIView alloc] initWithFrame:CGRectMake(10.0, 0.0, 310.0, 40.0)];
// Set the view’s background color. We’ ll set it here to gray. Use any color you want.
[inputAccView setBackgroundColor:[UIColor lightGrayColor]];
// We can play a little with transparency as well using the Alpha property. Normally
// you can leave it unchanged.
[inputAccView setAlpha: 0.8];
// If you want you may set or change more properties (ex. Font, background image,e.t.c.).
// For now, what we’ ve already done is just enough.
// Let’s create our buttons now. First the previous button.
btnPrev = [UIButton buttonWithType: UIButtonTypeCustom];
// Set the button’ s frame. We will set their widths to 80px and height to 40px.
[btnPrev setFrame: CGRectMake(0.0, 0.0, 80.0, 40.0)];
// Title.
[btnPrev setTitle: @"Previous" forState: UIControlStateNormal];
// Background color.
[btnPrev setBackgroundColor: [UIColor blueColor]];
// You can set more properties if you need to.
// With the following command we’ ll make the button to react in finger tapping. Note that the
// gotoPrevTextfield method that is referred to the @selector is not yet created. We’ ll create it
// (as well as the methods for the rest of our buttons) later.
[btnPrev addTarget: self action: @selector(gotoPrevTextfield) forControlEvents: UIControlEventTouchUpInside];
// Do the same for the two buttons left.
btnNext = [UIButton buttonWithType:UIButtonTypeCustom];
[btnNext setFrame:CGRectMake(85.0f, 0.0f, 80.0f, 40.0f)];
[btnNext setTitle:@"Next" forState:UIControlStateNormal];
[btnNext setBackgroundColor:[UIColor blueColor]];
[btnNext addTarget:self action:@selector(gotoNextTextfield) forControlEvents:UIControlEventTouchUpInside];
btnDone = [UIButton buttonWithType:UIButtonTypeCustom];
[btnDone setFrame:CGRectMake(240.0, 0.0f, 80.0f, 40.0f)];
[btnDone setTitle:@"Done" forState:UIControlStateNormal];
[btnDone setBackgroundColor:[UIColor greenColor]];
[btnDone setTitleColor:[UIColor blackColor] forState:UIControlStateNormal];
[btnDone addTarget:self action:@selector(doneTyping) forControlEvents:UIControlEventTouchUpInside];
// Now that our buttons are ready we just have to add them to our view.
[inputAccView addSubview:btnPrev];
[inputAccView addSubview:btnNext];
[inputAccView addSubview:btnDone];
}
[/code]
That method will create the buttons we need and prepare the inputAccView view.
Now implement the UITextField’s delegate method textFieldDidBeginEditing. By using that method, we’ll know when a textfield becomes first responder (gains the focus), so we can attach the input accessory view.
[code language=”obj-c”]
-(void)textFieldDidBeginEditing:(UITextField *)textField{
// Call the createInputAccessoryView method we created earlier.
// By doing that we will prepare the inputAccView.
[self createInputAccessoryView];
// Now add the view as an input accessory view to the selected textfield.
[textField setInputAccessoryView:inputAccView];
// Set the active field. We’ ll need that if we want to move properly
// between our textfields.
txtActiveField = textField;
}
[/code]
Note the txtActiveField. In that object is stored the selected UITextField every time it has the focus. That field will be used next and will help us to distinct which field is selected and how to move between them.
Inside the createInputAccessoryView method we used three methods: gotoPrevTextfield, gotoNextTextfield and doneTyping that they will trigger every event but they are not yet implemented. Go above the createInputAccessoryView method and copy or type the following three methods (the code inside them is quite straightforward and self-explanatory even though I’ve added some comments as well):
[code language=”obj-c”]
-(void)gotoPrevTextfield{
// If the active textfield is the first one, can’t go to any previous
// field so just return.
if (txtActiveField == txtField1) {
return;
}
else {
// Otherwise if the second textfield has the focus, the operation
// of "previous" button can be done and set the first field as the first
// responder.
[txtField1 becomeFirstResponder];
}
// NOTE: If you have more than two textfields, you modify the if… blocks
// according to your needs. The example here is quite simple and in a complete
// app it’s possible that you’ll have more than two textfields.
}
-(void)gotoNextTextfield{
// If the active textfield is the second one, there is no next so just return.
if (txtActiveField == txtField2) {
return;
}
else {
// Make the second textfield our first responder.
[txtField2 becomeFirstResponder];
}
}
-(void)doneTyping{
// When the "done" button is tapped, the keyboard should go away.
// That simply means that we just have to resign our first responder.
[txtActiveField resignFirstResponder];
}
[/code]
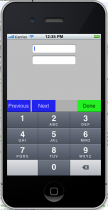
That’s it. Build and run the app. Every time that we tap in a textfield three more buttons will show up along with the keyboard. Play with next, previous or done button. Below is an example on what you should see:

Please note that the buttons in this example are quite simple and of course in a real application you should take care of creating beautiful ones, using images or nice colors. That’s up to your imagination. It would be a good idea to use background images for both normal and highlighted state for your buttons if you want to achieve the “animation” that simulates the finger tap.
That’s all for the time being. There are more posts that will come (hopefully) soon. In any case, don’t hesitate to experiment with everything that I mentioned in this post. I hope it will be useful.
Have a nice iPhone programming day.
This tutorial was transferred as it was originally written in my blog, therefore some techniques, tools or SDKs may have changed since then.